
Table of Contents
#2 – Creating and Publishing My First C# Lambda Project
In the last Blog we setup Visual studio and created an IAM user with the permissions to create a Lambada function. Next we will create a simple Lambda function and upload it to AWS.
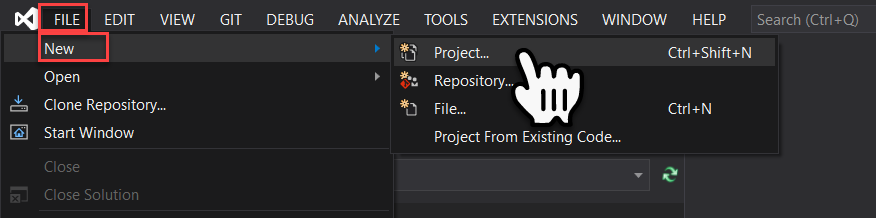
Visual Studio New Project
Within Visual Studio, select File->New->Project, from the top pull down menu.
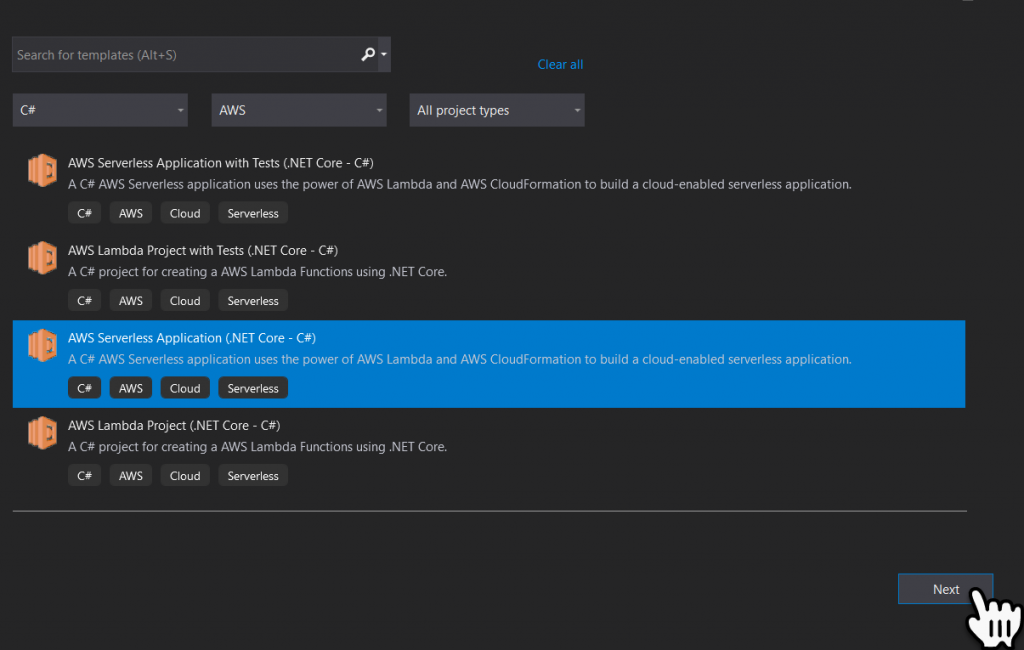
From the templates list filter by C#, AWS, and All Project Types, then select the AWS Serverless Application (.NET Core – C#) from the list and pick Next.
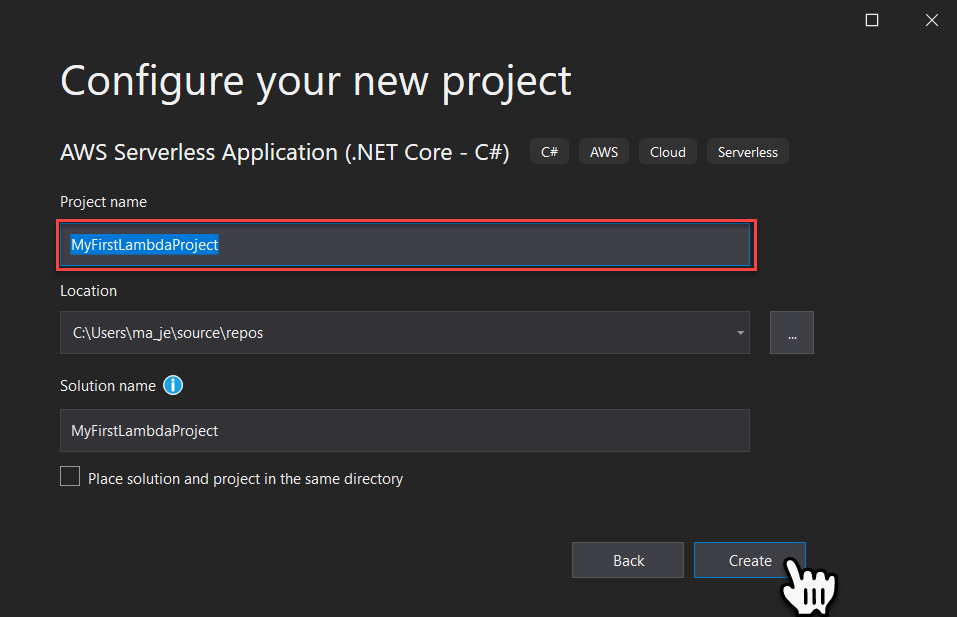
Next we will Name our project, you can also define the folder location where the project will be created. Once you ahve named your project and made any other changes select Create.
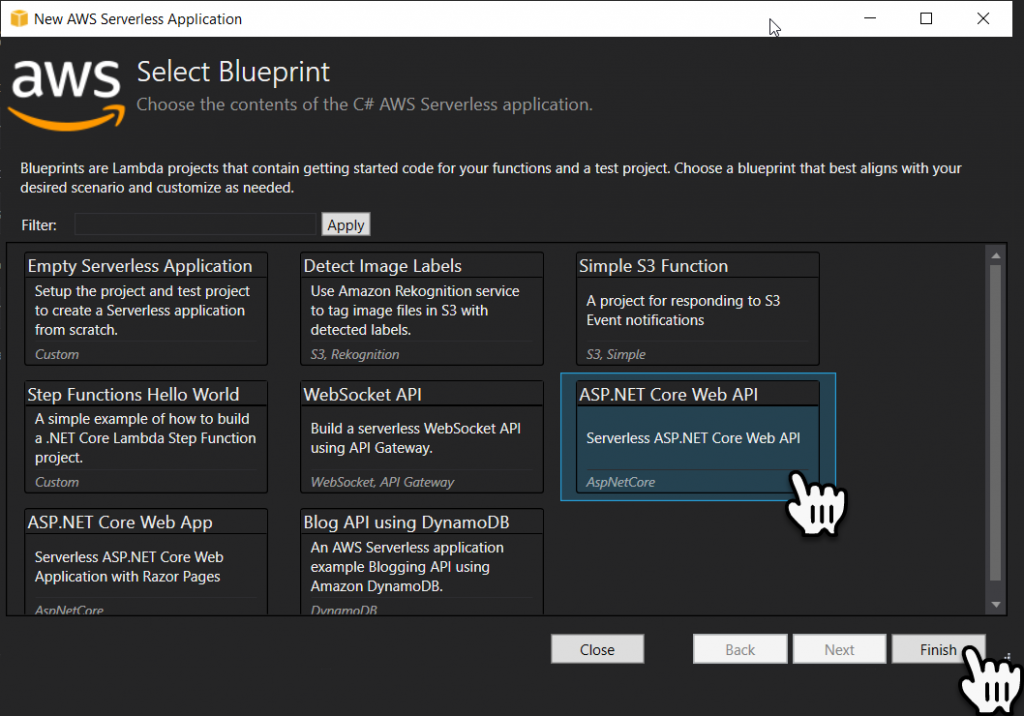
Select the ‘ASP.NET Core Web API’ Blueprint then select Finish.
Within Visual Studio the project will be created from the AWS template, as shown below;

Configuring the Project
Serverless Template
First thing we will do is edit the Serverless Template, this is used to configure the AWS API Gateway and the Lambda function. When we first look at it, it contains a lot of additional stuff we wont need.
{
  "AWSTemplateFormatVersion": "2010-09-09",
  "Transform": "AWS::Serverless-2016-10-31",
  "Description": "An AWS Serverless Application that uses the ASP.NET Core framework running in Amazon Lambda.",
  "Parameters": {
    "ShouldCreateBucket": {
      "Type": "String",
      "AllowedValues": [
        "true",
        "false"
      ],
      "Description": "If true then the S3 bucket that will be proxied will be created with the CloudFormation stack."
    },
    "BucketName": {
      "Type": "String",
      "Description": "Name of S3 bucket that will be proxied. If left blank a name will be generated.",
      "MinLength": "0"
    }
  },
  "Conditions": {
    "CreateS3Bucket": {
      "Fn::Equals": [
        {
          "Ref": "ShouldCreateBucket"
        },
        "true"
      ]
    },
    "BucketNameGenerated": {
      "Fn::Equals": [
        {
          "Ref": "BucketName"
        },
        ""
      ]
    }
  },
  "Resources": {
    "AspNetCoreFunction": {
      "Type": "AWS::Serverless::Function",
      "Properties": {
        "Handler": "MyFirstLambdaProject::MyFirstLambdaProject.LambdaEntryPoint::FunctionHandlerAsync",
        "Runtime": "dotnetcore3.1",
        "CodeUri": "",
        "MemorySize": 256,
        "Timeout": 30,
        "Role": null,
        "Policies": [
          "AWSLambdaFullAccess"
        ],
        "Environment": {
          "Variables": {
            "AppS3Bucket": {
              "Fn::If": [
                "CreateS3Bucket",
                {
                  "Ref": "Bucket"
                },
                {
                  "Ref": "BucketName"
                }
              ]
            }
          }
        },
        "Events": {
          "ProxyResource": {
            "Type": "Api",
            "Properties": {
              "Path": "/{proxy+}",
              "Method": "ANY"
            }
          },
          "RootResource": {
            "Type": "Api",
            "Properties": {
              "Path": "/",
              "Method": "ANY"
            }
          }
        }
      }
    },
    "Bucket": {
      "Type": "AWS::S3::Bucket",
      "Condition": "CreateS3Bucket",
      "Properties": {
        "BucketName": {
          "Fn::If": [
            "BucketNameGenerated",
            {
              "Ref": "AWS::NoValue"
            },
            {
              "Ref": "BucketName"
            }
          ]
        }
      }
    }
  },
  "Outputs": {
    "ApiURL": {
      "Description": "API endpoint URL for Prod environment",
      "Value": {
        "Fn::Sub": "https://${ServerlessRestApi}.execute-api.${AWS::Region}.amazonaws.com/Prod/"
      }
    },
    "S3ProxyBucket": {
      "Value": {
        "Fn::If": [
          "CreateS3Bucket",
          {
            "Ref": "Bucket"
          },
          {
            "Ref": "BucketName"
          }
        ]
      }
    }
  }
}
So for this example here is the simplified Serverless Template, where I have stripped out the S3 Bucket references. I have also added a ‘GetEvent’.
{
  "AWSTemplateFormatVersion": "2010-09-09",
  "Transform": "AWS::Serverless-2016-10-31",
  "Description": "An AWS Serverless Application that uses the ASP.NET Core framework running in Amazon Lambda.",
  "Parameters": {
  },
  "Resources": {
    "AspNetCoreFunction": {
      "Type": "AWS::Serverless::Function",
      "Properties": {
        "Handler": "MyFirstLambdaProject::MyFirstLambdaProject.LambdaEntryPoint::FunctionHandlerAsync",
        "Runtime": "dotnetcore3.1",
        "CodeUri": "",
        "MemorySize": 256,
        "Timeout": 30,
        "Role": null,
        "Policies": ["AWSLambdaFullAccess"],
        "Environment": {
          "Variables": {
          }
        },
        "Events": {
                    "GetEvent": {"Type": "Api", "Properties": {"Path": "/api/values","Method": "GET"}}
            }
      }
    }
  }
}
Editing the Controller
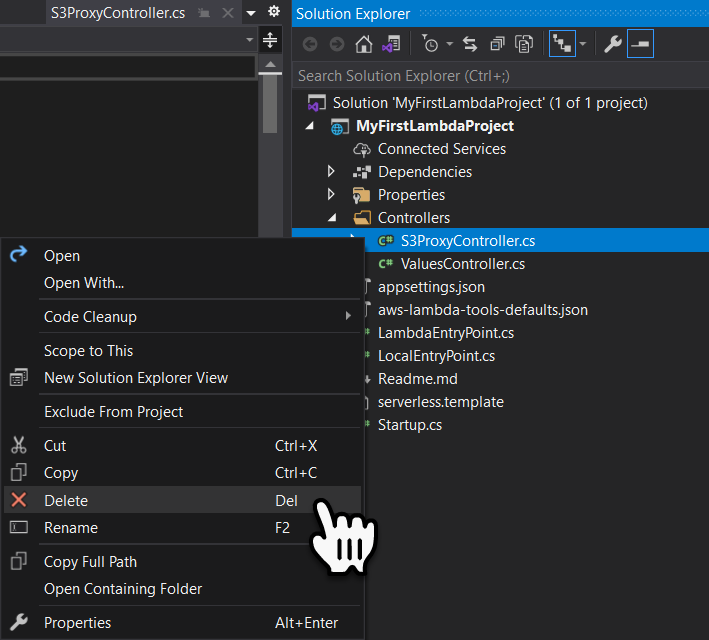
The first thing well do is Delete the ‘S3ProxyController’ example.
We will also simplify the ‘ValuesController.cs’ as shown below for our first lambda example.
using System.Collections.Generic;
using Microsoft.AspNetCore.Mvc;

namespace MyFirstLambdaProject.Controllers
{
    public class ValuesController : ControllerBase
    {
        [HttpGet("/api/values")]
        public IEnumerable<string> Get()
        {
            return new string[] { "value1", "value2" };
        }
    }
}
Creating an S3 Bucket
When we upload the lambda function to AWS we must specify an S3 bucket, that will store a zip file of the compiled code and the serverless template.
To do this we will log into the AWS Service Console and navigate to the S3 bucket dashboard, and select Create Bucket.
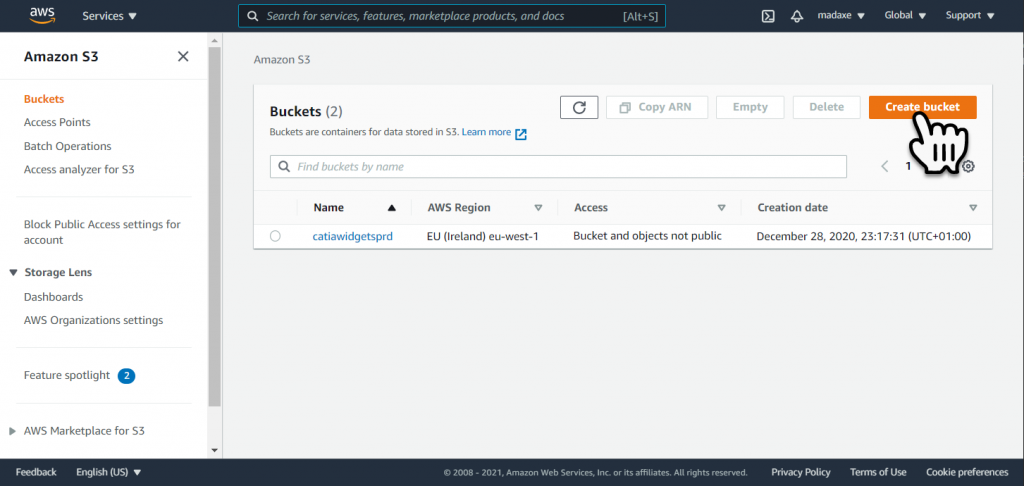
In the ‘General Configuration’ section key in a Bucket Name and select the AWS Region.

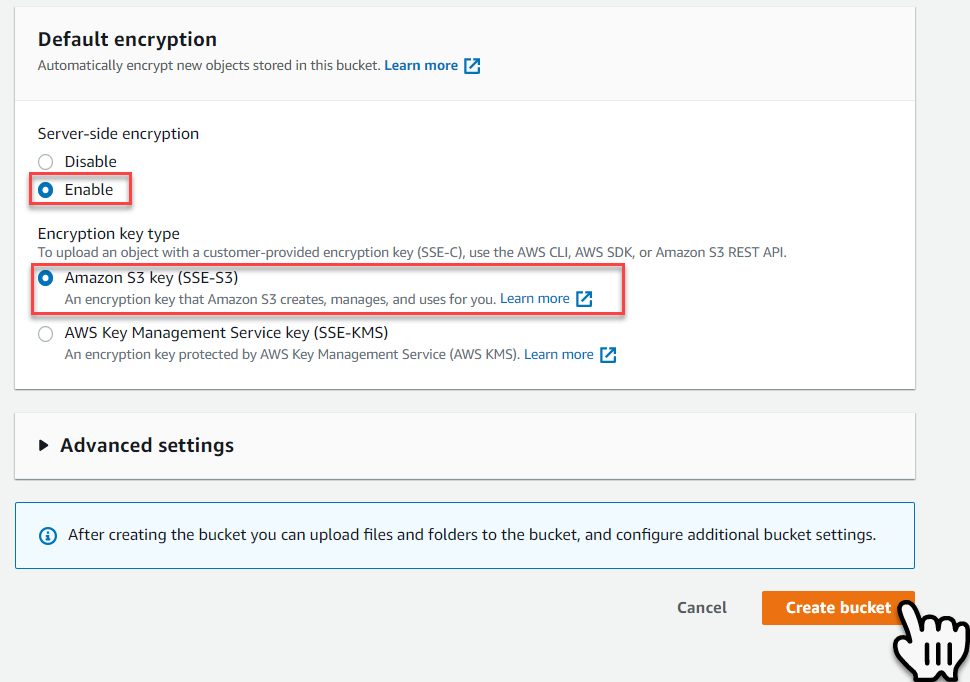
Down in the ‘Default Encryption’ section we will Enable the ‘Server-Side encryption’ and use the Default ‘Encryption Key Type’, Amazon S3 Key (SSE-S3). Then select Create Bucket.
Visual Studio Publishing to Lambda
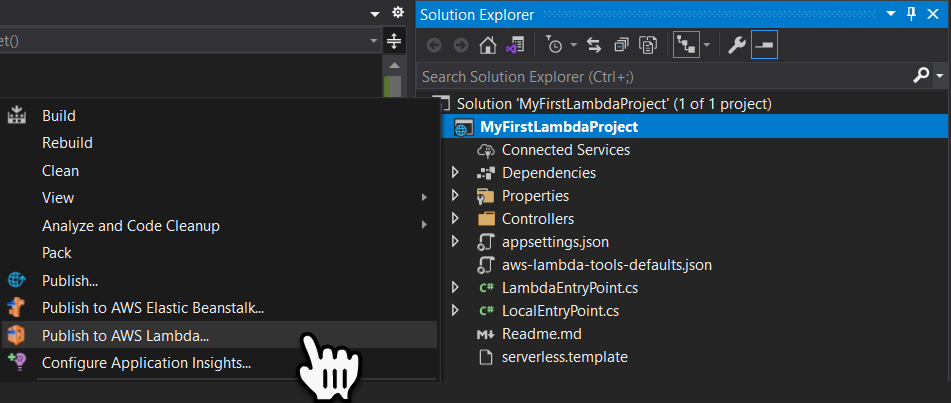
Within Visual Studio, Right Mouse Click on the project and select Publish to AWS Lambda from the contextual menu.
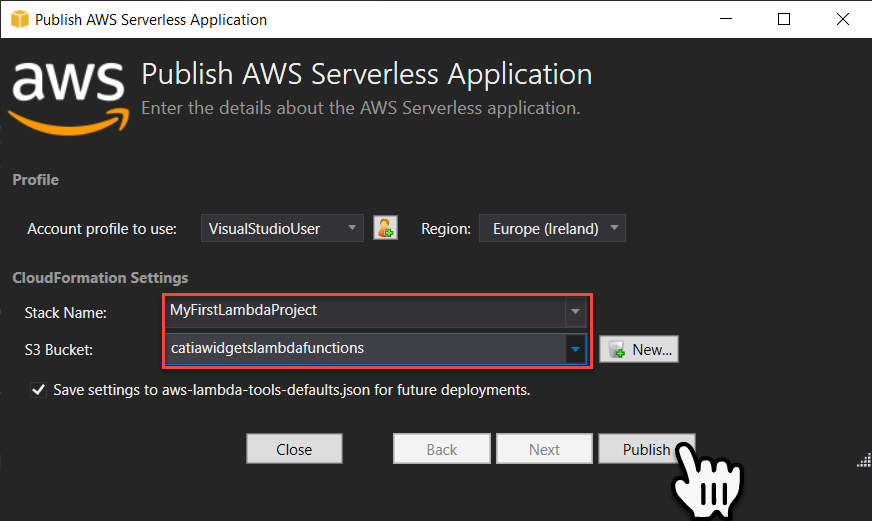
Within the Publish AWS Serverless Application dialogue window, key in a Stack Name and select an S3 Bucket, then select the Publish button.
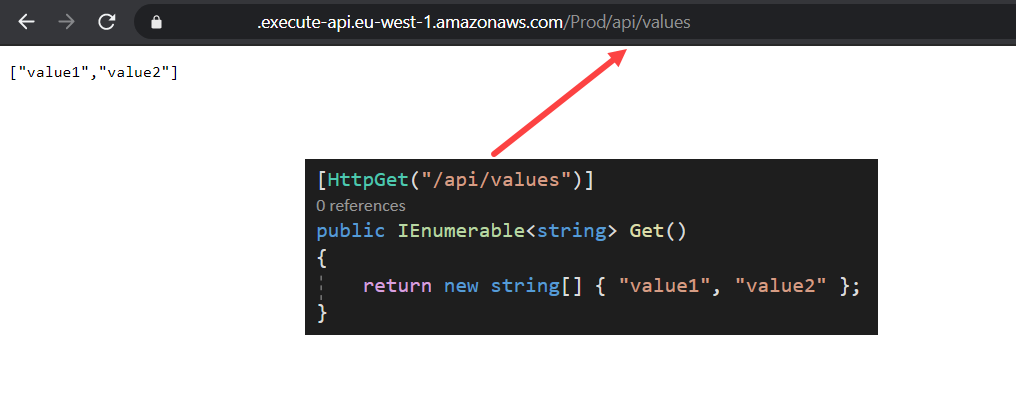
If the publication works you will see Update Complete in the ‘Status’. Also the AWS Serverless URL will be created. This is the URL root of the web API. Select the Copy link to the right of the URL.

We can now past the Root URL into a web browser and add the API End point. We can now see that we get back the return string from our web API.
Now we have a working AWS Lambda function. The next example we will connect to our RDS MySQL database, so we can Read / Write / Update and Delete data.