
Table of Contents
C# Create a Client and Server with TCPListener
In this post were going to create a simple server using TCPListener and send a memory stream to it from a WPF Client. The memory stream will be broken up into chunks of bytes as follows;

This structure will allow us to have up to 256 option codes (OptCodes) that are 1 byte and will always be the first byte. The next block will be 4 bytes and will be used to store the byte size for the proceeding chunk of data. 4 bytes, or 32 bits, which allows us to store 65536*65536 distinct values. This gives a range of approximately 4 billion bytes of storage for the proceeding chunk. This pattern of 4 bytes and n bytes will be replicated allowing us to store n number of data sets within the memory stream.
Visual Studio Solution
The visual studio solution will be broken up into three projects; Client Side App (WPF Project), Server Side App (Console Project), and a Class Library Project for common code.

Visual Studio Need to Know
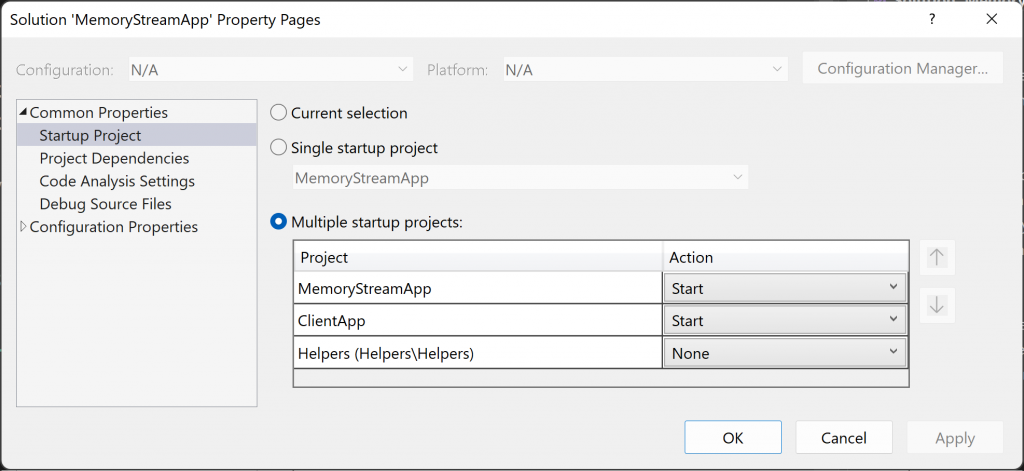
We will nee to know a couple of things in visual studio to be able to start two projects concurrently, within the solution property’s, under Startup Project settings we need to ensure that the Multiple Startup Projects option is enabled, and that the Console Project starts first and the WPF Project secondarily. The Action both must be set to Start and using the arrows organized as shown below.
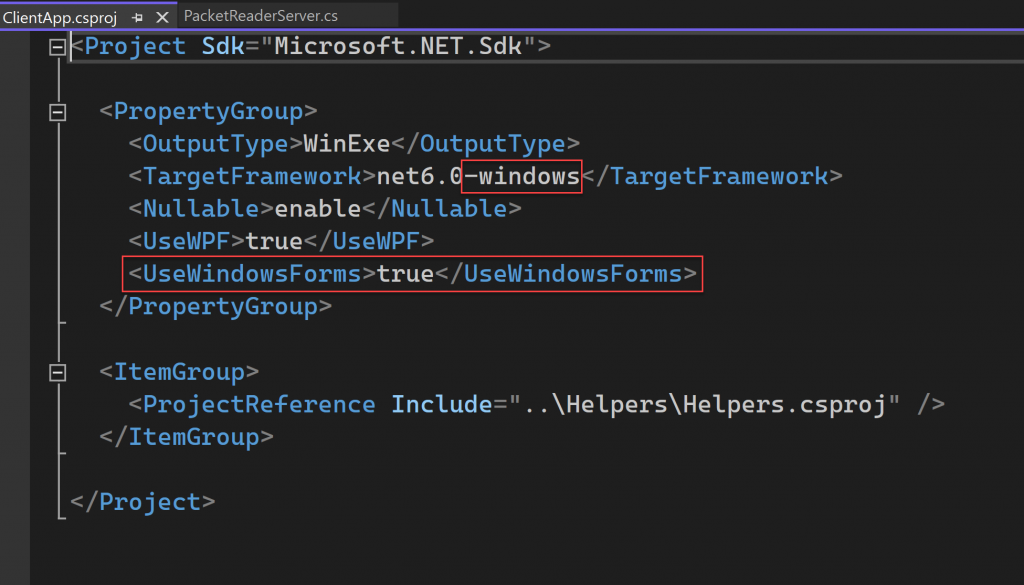
In addition to this we want to be able to use the file selection object within the WPF application to do this we must double click on the WPF Project and add some additional XML tags as shown below. The “-windows” defines that the WPF project can only be compiled for windows, and the “UseWindowsForms” tag allows us to use System.Windows.Forms within the project for the file selection object.
WPF Application
The WPF application will show you how to connect to the server and how to send messages that contain text, images (files) so essentially anything you want, so lets get started, on the server side we can process this data anyway we want.
WPF XML
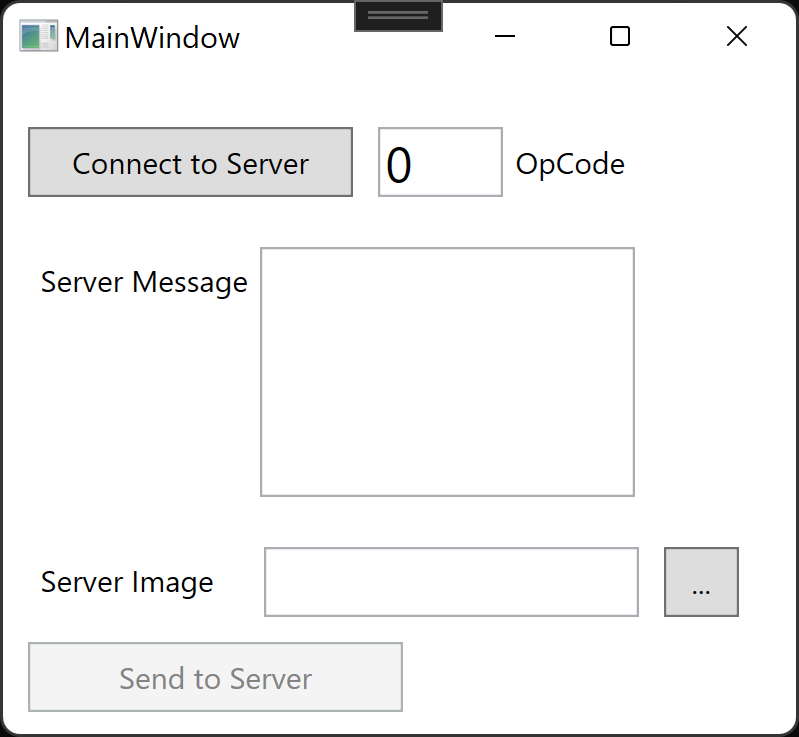
The XAML shown below creates a very basic WPF window that allows us to connect to the server with a given Option Code and then have the ability to send a Message and an Image selected from the Client that will be stored on the Server.
<Window x:Class="ClientApp.MainWindow"
        xmlns="http://schemas.microsoft.com/winfx/2006/xaml/presentation"
        xmlns:x="http://schemas.microsoft.com/winfx/2006/xaml"
        xmlns:d="http://schemas.microsoft.com/expression/blend/2008"
        xmlns:mc="http://schemas.openxmlformats.org/markup-compatibility/2006"
        xmlns:local="clr-namespace:ClientApp"
        xmlns:viewmodels="clr-namespace:ClientApp.ViewModels"
        mc:Ignorable="d"
        Title="MainWindow" Height="300" Width="330">
    <Window.DataContext>
        <viewmodels:MainViewModel/>
    </Window.DataContext>
    <Grid>
        <StackPanel Orientation="Vertical">
            <StackPanel Orientation="Horizontal" Margin="0 12 0 0">
                <Button Content="Connect to Server"
                HorizontalAlignment="Left"
                Margin="10,10,0,0"
                VerticalAlignment="Top"
                Height="28" Width="130"
                Command="{Binding ConnecttoServerCommand}"/>
                <TextBox HorizontalAlignment="Left"
                 Height="28" Width="50"
                 Margin="10,10,0,0"
                 Text="{Binding OpCode}"
                 FontSize="20"
                 VerticalAlignment="Top"/>
                <Label Content="OpCode" VerticalAlignment="Center" Margin="0 10 0 0"/>
            </StackPanel>

            <StackPanel Orientation="Horizontal" Margin="10 20 0 0">
                <Label Content="Server Message"/>
                <TextBox Width="150" Height="100"
                         TextWrapping="Wrap"
                         Text="{Binding ServerMessage,UpdateSourceTrigger=PropertyChanged}"/>
            </StackPanel>
            <StackPanel Orientation="Horizontal" Margin="10 20 0 0">
                <Label Content="Server Image" Margin="0 0 15 0"/>
                <TextBox Width="150" Height="28"
                         Text="{Binding ServerImagePath,UpdateSourceTrigger=PropertyChanged}"/>
                <Button Content="..." Width="30"
                        Margin="10 0 0 0"
                        Command="{Binding SelectImageCommand}"/>
            </StackPanel>
            <Button Content="Send to Server"
                    Height="28"  Width="150"
                    HorizontalAlignment="Left"
                    Margin="10 10 0 0"
                    Command="{Binding SendtoServerCommand}"/>
        </StackPanel>
    </Grid>
</Window>
Relay Command Base
The relay command will allow us to bind the WPF UI to our code behind using the MVVM pattern.
using System;
using System.Windows.Input;

namespace ClientApp.Commands
{
    public class RelayCommandBase : ICommand
    {
        private Action<object>? _execute = null;
        private Func<object, bool>? _canExecute = null;

        public event EventHandler? CanExecuteChanged
        {
            add { CommandManager.RequerySuggested += value; }
            remove { CommandManager.RequerySuggested -= value; }
        }
        public RelayCommandBase(Action<object>? execute, Func<object, bool>? canexecute)
        {
            _execute = execute;
            _canExecute = canexecute;
        }
        public bool CanExecute(object? parameter)
        {
            return _canExecute == null || _canExecute(parameter);
        }
        public void Execute(object? parameter)
        {
                _execute(parameter);
        }
    }
}
Filesystem Helper
The Filesystem Helper in this case only has one method that allows a user to select a file that we will then convert to a byte array and append it to the memory stream being send to the server.
using System;
using System.Windows.Forms;

namespace ClientApp.Helpers
{
    public static class FileSystemHelper
    {
        public static string SelectFile(string filter="*.txt")
        {
            using (var fileBrowserDialog = new OpenFileDialog())
            {
                fileBrowserDialog.Multiselect = true;
                fileBrowserDialog.Filter = string.Format("Text files ({0})|{0}|All files (*.*)|*.*",filter);
                fileBrowserDialog.InitialDirectory = Environment.GetFolderPath(Environment.SpecialFolder.MyDocuments);
                DialogResult result = fileBrowserDialog.ShowDialog();

                if (result == DialogResult.OK && !string.IsNullOrWhiteSpace(fileBrowserDialog.FileName))
                {
                    return fileBrowserDialog.FileName;
                }
            }
            return string.Empty;
        }
    }
}
Packet Writer Server
The Packet Writer Server, will create a new instance of the TCPClient, that we will use to connect tot he TCPListener on the server. This class will also contain any method of transmitting data, and we will need two to get started; Connect To Server and Send to Server. The Connect to Server method we have hard coded the servers IP Address and Port number, it would probably be better to get this data from a configuration file but for now this is fine. For the initial connection we send the Option Code and the windows User Name. The Send to Server method also sends an Option Code, but this time well also send a Message and an Image. We will get into the nitty gritty of the methods that build the Memory Stream in a second, it important to note that we also construct the Packet Reader Helper and Writer Helper within the methods and not in the class constructor, this stops old Messages being resent.
using Helpers;

using System.Net.Sockets;
using System.Security.Principal;

namespace ClientApp.Servers
{
    public class PacketWriterServer
    {
        private TcpClient _client;
        private PacketWriterHelper? _packetWriter = null;
        public PacketReaderHelper? _packetReader = null;
        public PacketWriterServer()
        {
            _client = new TcpClient();
        }
        public void ConnectToServer(int opCode = 0)
        {
            if (!_client.Connected)
            {
                _client.Connect("127.0.0.1", 7891);
                _packetReader = new PacketReaderHelper(_client.GetStream());
                _packetWriter= new PacketWriterHelper();
                _packetWriter.WriteOpCode((byte)opCode);

                string userName = WindowsIdentity.GetCurrent().Name;
                _packetWriter.WriteMessage(userName);

                _client.Client.Send(_packetWriter.GetPacketBytes());
            }
        }
        public void SendtoServer(string serverMessage, string filePath, int opCode = 1)
        {
            if (_client.Connected)
            {
                _packetReader = new PacketReaderHelper(_client.GetStream());
                _packetWriter = new PacketWriterHelper();
                _packetWriter.WriteOpCode((byte)opCode);
                _packetWriter.WriteMessage(serverMessage);
                _packetWriter.WriteFile(filePath);

                _client.Client.Send(_packetWriter.GetPacketBytes());
            }
        }
    }
}
View Model Base
When using the MVVM pattern we must implement INotifyPropertyChanged and the easiest way to do this is to construct this simple View Model Base and inherit it into all View Models.
using System.ComponentModel;

namespace ClientApp.ViewModels.ViewModelsBase
{
    public class ViewModelBase : INotifyPropertyChanged
    {
        public event PropertyChangedEventHandler? PropertyChanged;

        protected void OnPropertyChanged(string propertyName)
        {
            PropertyChanged?.Invoke(this, new PropertyChangedEventArgs(propertyName));
        }
    }
}
Main View Model
The Main View Model creates the logic behind the WPF UI, and creates the Packet Writer Server instance.
using ClientApp.Commands;
using ClientApp.Helpers;
using ClientApp.Servers;
using ClientApp.ViewModels.ViewModelsBase;

namespace ClientApp.ViewModels
{
    public class MainViewModel : ViewModelBase
    {
        private PacketWriterServer _packetWriterServer { get; }
        public RelayCommandBase ConnecttoServerCommand { get; set; }
        public RelayCommandBase SendtoServerCommand { get; set; }
        public RelayCommandBase SelectImageCommand { get; set; }

        private int _opCode = 0;
        public int OpCode
        {
            get { return _opCode; }
            set { _opCode = value; OnPropertyChanged(nameof(OpCode)); }
        }
        private string _serverMessage = string.Empty;
        public string ServerMessage
        {
            get { return _serverMessage; }
            set { _serverMessage = value; OnPropertyChanged(nameof(ServerMessage)); }
        }
        private string _serverImagePath = string.Empty;
        public string ServerImagePath
        {
            get { return _serverImagePath; }
            set { _serverImagePath = value; OnPropertyChanged(nameof(ServerImagePath)); }
        }
        public MainViewModel()
        {
            _packetWriterServer = new PacketWriterServer();
            ConnecttoServerCommand = new RelayCommandBase(o => _packetWriterServer.ConnectToServer(OpCode), o => !string.IsNullOrEmpty(OpCode.ToString()));
            SendtoServerCommand = new RelayCommandBase(o => _packetWriterServer.SendtoServer(ServerMessage, ServerImagePath), o => !string.IsNullOrEmpty(ServerMessage) && !string.IsNullOrEmpty(ServerImagePath));
            SelectImageCommand = new RelayCommandBase(o => SetServerImagePath(), null);
        }
        private void SetServerImagePath()
        {
            ServerImagePath = FileSystemHelper.SelectFile(".jpg");
        }
    }
}
Helpers Class Project
The two classes within this project are the heart and soul of this proof of concept application, and allow us to construct the deconstruct the memory stream in the way that we want to.
Packet Writer Helper
The Packet Writer Helper class will use the Binary Writer object to simplify the way in which we construct the memory stream. the Write Option Code method writes a single byte to the memory stream with a value of 0 to 255, so we can have up to 256 different message structures. Before each chunk of the memory stream we need to send how many bytes that will span the chunk. This is done with a 4 byte block or 32 bits of data or ‘Int32’, and is encapsulated by the Write Next Chunk Size method, which is called prior to writing a large chunk of data to the memory stream. The next two methods write string messages and files to the memory stream for the main data chunks and finally the method to convert the memory stream to a byte array.
using System.Text;

namespace Helpers
{
    public class PacketWriterHelper : BinaryWriter
    {
        public MemoryStream MemoryStream;
        public BinaryWriter BinaryWriter;
        public PacketWriterHelper()
        {
            MemoryStream = new MemoryStream();
            BinaryWriter = new BinaryWriter(MemoryStream);
        }
        public void WriteOpCode(byte opCode)
        {
            MemoryStream.WriteByte(opCode);
        }
        public void WriteNextChunckSize(int chunkSize)
        {
            BinaryWriter.Write((Int32)chunkSize);
        }
        public void WriteMessage(string message)
        {
            byte[] byteArray = Encoding.UTF8.GetBytes(message);
            WriteNextChunckSize(byteArray.Length);
            BinaryWriter.Write(byteArray);
        }
        public void WriteFile(string imagePath)
        {
            byte[] byteArray = File.ReadAllBytes(imagePath);
            WriteNextChunckSize(byteArray.Length);
            BinaryWriter.Write(byteArray);
        }
        public byte[] GetPacketBytes()
        {
            return MemoryStream.ToArray();
        }
    }
}
Packet Reader Helper
The Packet Reader Helper will take the Network Memory Stream from the TCPListener and allow us to decompose it back into the chunks of data being sent. The Read Options Code method reads a single byte to get the Option code which we can then interpret to understand which of the 256 options are being sent. The Read Chunk Size method is the key to detangling the memory stream into the chunks since it reads the four bytes prior to the data chunk and tells us how many bytes we must read for each data chunk. The Read Message and the Read File methods have been scaffolded out for the proof of concept and would need more wok to productionize them.
using System.IO;
using System.Net.Sockets;
using System.Text;

namespace Helpers
{
    public class PacketReaderHelper : BinaryReader
    {
        private NetworkStream _memoryStream;
        private BinaryReader _binaryReader;
        public PacketReaderHelper(NetworkStream memoryStream) : base(memoryStream)
        {
            _memoryStream = memoryStream;
            _binaryReader = new BinaryReader(memoryStream);
        }
        public int ReadOpCode()
        {
            return _memoryStream.ReadByte();
        }
        public string ReadMessage(int chunkSize)
        {
            byte[] readMessage;
            readMessage = new byte[chunkSize];
            _memoryStream.Read(readMessage, 0, chunkSize);
            var message = Encoding.UTF8.GetString(readMessage);
            return message;
        }
        public string ReadFile(int chunkSize)
        {
            byte[] readFile;
            readFile = new byte[chunkSize];
            _memoryStream.Read(readFile, 0, chunkSize);

            using var writer = new BinaryWriter(File.OpenWrite(@"C:\Users\me\Desktop\test.jpg"));
            writer.Write(readFile);
            return @"C:\test.jpg";
        }
        public int ReadChunkSize()
        {
            byte[] readChunkSize;
            readChunkSize = new byte[4];
            _memoryStream.Read(readChunkSize, 0, 4);
            return BitConverter.ToInt32(readChunkSize, 0);
        }
    }
}
Server Project
The Server Project is a Hosted Server application and can be compiled for either Windows or Linux, this proof of concept only writes data to the console for now.
Program (Console Class)
Were going to use dependency injection and hosted service to create an instance of our server, this keeps the console application nice and clean.
using MemoryStreamApp.Servers;
using Microsoft.Extensions.DependencyInjection;
using Microsoft.Extensions.Hosting;

Host.CreateDefaultBuilder()
    .ConfigureServices((context, services) =>
    {
        services.AddHostedService<PacketReaderServer>();
    })
.Build()
.Run();
Packet Reader Server
The Packet Reader Server implements IHostedService and has two Async Methods that need to be defined; Start Async and Stop Async. Within the Stop Async we simply return the Completed Task. The Start Async method creates the new TCPListener on the required IPAddress and Port to match the TCPClient. Then within the While loop each time a Client connects we create a new Client Connection which will handle the messaging from the client. This way each client connection manages the workload for its connected client on a separate thread, as we will see in a second.
using MemoryStreamApp.Models;

using Microsoft.Extensions.Hosting;

using System.Net;
using System.Net.Sockets;

namespace MemoryStreamApp.Servers
{
    public class PacketReaderServer : IHostedService
    {
        public List<ClientConnectionModel> ClientConnections = new List<ClientConnectionModel>() { };
        public async Task StartAsync(CancellationToken cancellationToken)
        {
            TcpListener _tcpListener = new TcpListener(IPAddress.Parse("127.0.0.1"), 7891);
            _tcpListener.Start();

            while (!cancellationToken.IsCancellationRequested)
            {
                var clientConnection = new ClientConnectionModel(this, _tcpListener.AcceptTcpClient());
                ClientConnections.Add(clientConnection);

                await Task.Delay(1000);
            }
        }
        public Task StopAsync(CancellationToken cancellationToken)
        {
            return Task.CompletedTask;
        }
    }
}
Client Connection Model
The Client Connection Model manages the initial Client Connection within its constructor, after which a separate process thread then takes care of any additional communication between the server and the client. The Process method is just a proof of concept and will be rewritten later on.
using Helpers;
using MemoryStreamApp.Servers;
using System.Net.Sockets;

namespace MemoryStreamApp.Models
{
    public class ClientConnectionModel
    {
        private PacketReaderServer _packetReaderServer;
        private PacketReaderHelper _packetReaderHelper;
        public string UserName { get; set; }
        public TcpClient ClientSocket { get; set; }
        public ClientConnectionModel(PacketReaderServer packetReaderServer, TcpClient clientSocket)
        {
            _packetReaderServer = packetReaderServer;
            ClientSocket = clientSocket;

            _packetReaderHelper = new PacketReaderHelper(ClientSocket.GetStream());

            var opCode = _packetReaderHelper.ReadByte();
            UserName = _packetReaderHelper.ReadMessage(_packetReaderHelper.ReadChunkSize());

            Console.WriteLine(string.Format("{0} - Opcode Found With Value : {1}", DateTime.Now, opCode));
            Console.WriteLine(string.Format("{0} : Client has Connected with User Name : {1}", DateTime.Now, UserName));

            Task.Run(() => Process());
        }

        private void Process()
        {
            bool breakFlag = false;
            while (!breakFlag)
            {
                try
                {
                    int opCode = _packetReaderHelper.ReadByte();
                    int nextchunksize = 0;
                    string message = string.Empty;
                    string imagePath = string.Empty;
                    switch (opCode)
                    {
                        case 1:
                            Console.WriteLine(string.Format("{0} - Opcode Found With Value : {1}", DateTime.Now, opCode));
                            nextchunksize = _packetReaderHelper.ReadChunkSize();
                            Console.WriteLine(string.Format("{0} - Chunk Size Found With Value : {1}", DateTime.Now, nextchunksize));
                            message = _packetReaderHelper.ReadMessage(nextchunksize);
                            Console.WriteLine(string.Format("{0} - Message to Server is : {1}", DateTime.Now, message));
                            nextchunksize = _packetReaderHelper.ReadChunkSize();
                            Console.WriteLine(string.Format("{0} - Chunk Size Found With Value : {1}", DateTime.Now, nextchunksize));
                            imagePath = _packetReaderHelper.ReadFile(nextchunksize);
                            Console.WriteLine(string.Format("{0} : Image Found With Value {1}", DateTime.Now, imagePath));

                            break;
                        default:
                            break;
                    }
                }
                catch (Exception ex)
                {
                    Console.WriteLine(string.Format("UserName : {0} HashCode Been Disconnected.", UserName), ex.Message);
                    breakFlag = true;
                    ClientSocket.Close();
                }
            }
        }
    }
}
Working Example
Application Started
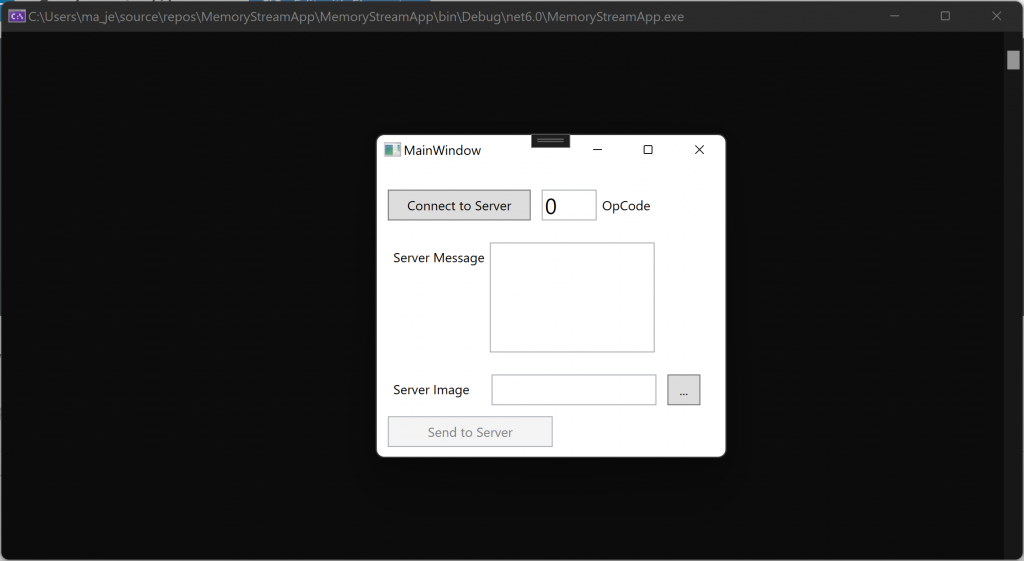
When the application starts we can see that the Server Application starts first (Console Window), and then the WPF Application secondarily.
Server Connection
When the user selects the Connect to Server button we can see in the Servers Console Window the connection being made and the User Name of the user making the connection.

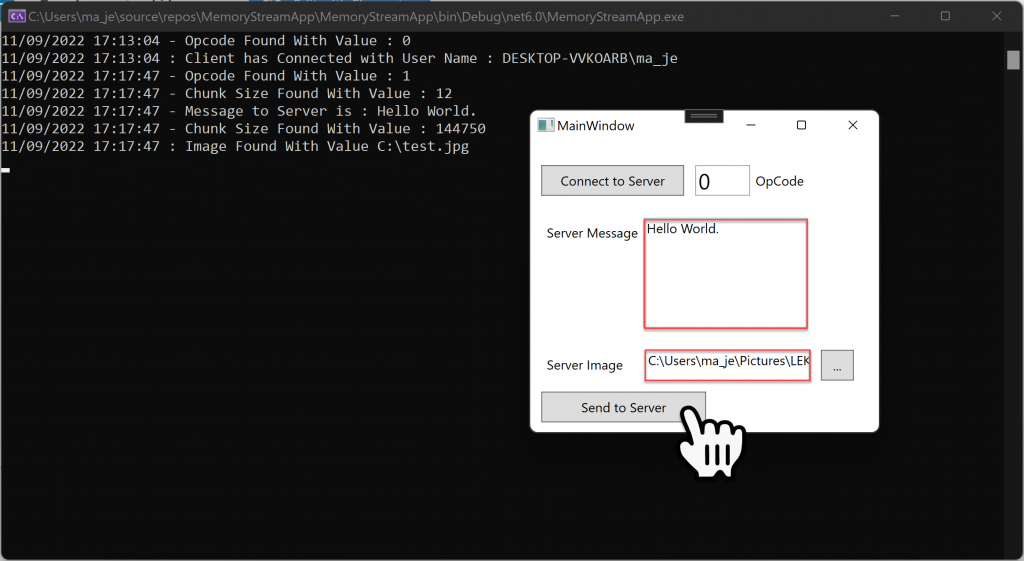
Send to Server
And if we give a Server message and a Path to the Server Image, when the user selects Send to Server , again we can see in the console that the Message and Image are sent to the server along with the chunk sizes for each chunk. This can now be expanded on to make an application with a server behind it.
Broadcasting a Message Back to the Client
So we can create a connection with the server and send data, now we want to be able to send data back to the client from the server.
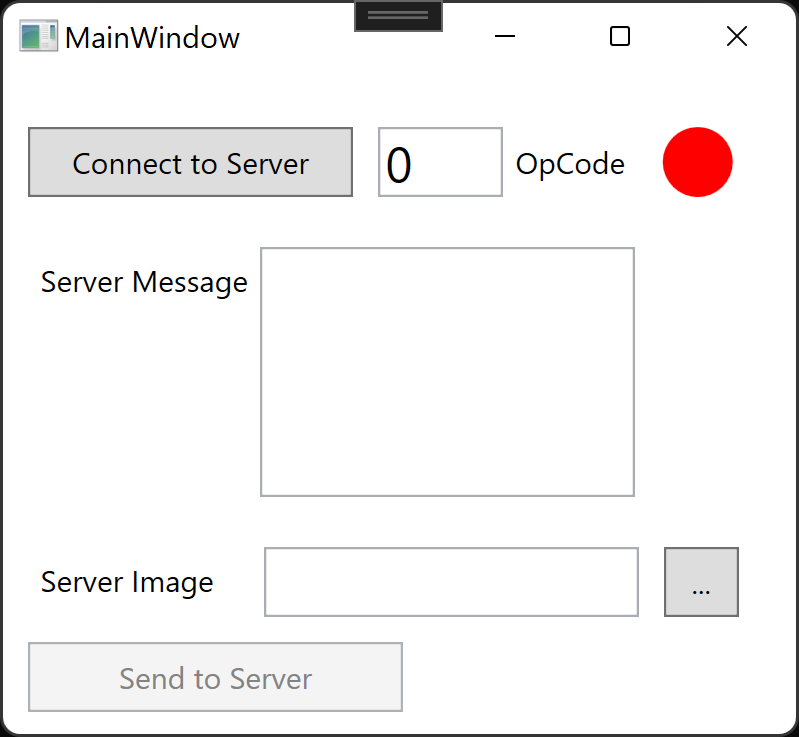
WPF Connection Bubble
Within the Client Side WPF UI we will add an Ellipse that’s bound to a Connection Color Brush property.
<Ellipse Width="28" Height="28"
                         Fill="{Binding ConnectionColor}"
                         VerticalAlignment="Bottom"
                         Margin="10 0 0 0"/>
Server Messaging Helpers
Within the Server Project we will be creating a new Project Folder for Helpers.
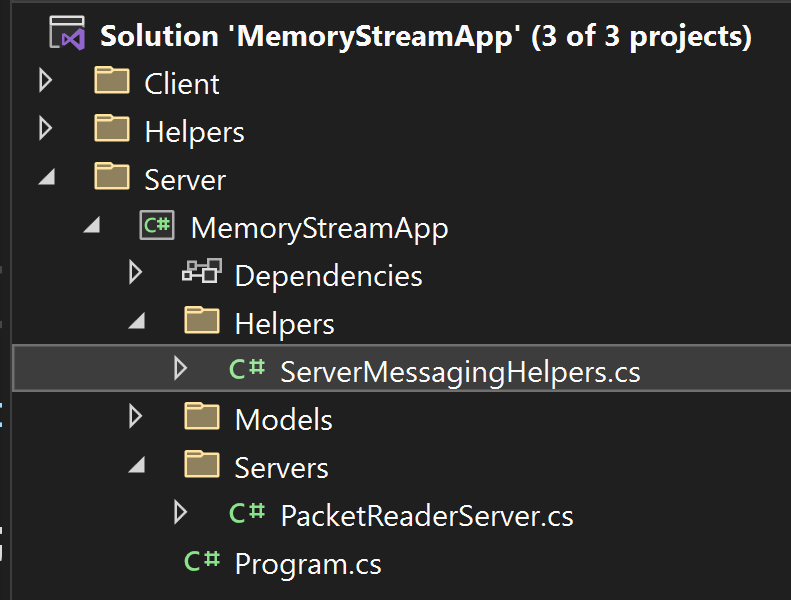
Within the new folder we will create a new class that’s dedicated to Broad Casting Messages back to the client, and we will start of with two methods as shown below.
using Helpers;
using MemoryStreamApp.Models;

namespace MemoryStreamApp.Helpers
{
    public static class ServerMessagingHelpers
    {
        public static void BroadCastConnection(ClientConnectionModel clientConnectionModel)
        {
            PacketWriterHelper packetWriterHelper = new PacketWriterHelper();
            packetWriterHelper.WriteOpCode(1);
            packetWriterHelper.WriteMessage("Server Connection Established.");
            clientConnectionModel.ClientSocket.Client.Send(packetWriterHelper.GetPacketBytes());
        }
        public static void BroadCastMessage(ClientConnectionModel clientConnectionModel,string message)
        {
            PacketWriterHelper packetWriterHelper = new PacketWriterHelper();
            packetWriterHelper.WriteOpCode(5);
            packetWriterHelper.WriteMessage(message);

            clientConnectionModel.ClientSocket.Client.Send(packetWriterHelper.GetPacketBytes());
        }
    }
}
Client Connection Model
Within the Client Connection Model, we will add a call to the new BroadCastConnection method.
public ClientConnectionModel(PacketReaderServer packetReaderServer, TcpClient clientSocket)
{
	_packetReaderServer = packetReaderServer;
	ClientSocket = clientSocket;

	_packetReaderHelper = new PacketReaderHelper(ClientSocket.GetStream());

	var opCode = _packetReaderHelper.ReadByte();
	UserName = _packetReaderHelper.ReadMessage(_packetReaderHelper.ReadChunkSize());

	Console.WriteLine(string.Format("{0} - OpCode Found With Value : {1}", DateTime.Now, opCode));
	Console.WriteLine(string.Format("{0} : Client has Connected with User Name : {1}", DateTime.Now, UserName));
  	// Broadcast Connection to Client
	ServerMessagingHelpers.BroadCastConnection(this);

	Task.Run(() => Process());
}
Packet Writer Server
Within the PacketWriterServer on the client side, we need to create a listening process that listens to the PacketReaderHelper on a separate thread. This will invoke an Action when a specific OpCode is detected.
using Helpers;
using System;
using System.Net.Sockets;
using System.Security.Principal;
using System.Threading.Tasks;

namespace ClientApp.Servers
{
    public class PacketWriterServer
    {
        private TcpClient _client;
        private PacketWriterHelper? _packetWriter = null;
        public PacketReaderHelper? _packetReader = null;

        public event Action? connectedEvent = null;
        public event Action? messageEvent = null;
        public event Action? disconnectedEvent = null;
        public PacketWriterServer()
        {
            _client = new TcpClient();
        }
        public void ConnectToServer(int opCode = 0)
        {
            if (!_client.Connected)
            {
                _client.Connect("127.0.0.1", 7891);
                _packetReader = new PacketReaderHelper(_client.GetStream());
                _packetWriter= new PacketWriterHelper();
                _packetWriter.WriteOpCode((byte)opCode);

                string userName = WindowsIdentity.GetCurrent().Name;
                _packetWriter.WriteMessage(userName);

                _client.Client.Send(_packetWriter.GetPacketBytes());

                Task.Run(() => Process());
            }
        }
        public void SendtoServer(string serverMessage, string filePath, int opCode = 1)
        {
            if (_client.Connected)
            {
                _packetReader = new PacketReaderHelper(_client.GetStream());
                _packetWriter = new PacketWriterHelper();
                _packetWriter.WriteOpCode((byte)opCode);
                _packetWriter.WriteMessage(serverMessage);
                _packetWriter.WriteFile(filePath);

                _client.Client.Send(_packetWriter.GetPacketBytes());
            }
        }
        private void Process()
        {
            try
            {
                while (true)
                {
                    if (_packetReader != null)
                    {
                        int opCode = _packetReader.ReadByte();
                        switch (opCode)
                        {
                            case 1:
                                connectedEvent?.Invoke();
                                break;
                            case 5:
                                messageEvent?.Invoke();
                                break;
                            case 255:
                                disconnectedEvent?.Invoke();
                                break;
                            default:
                                Console.WriteLine("Ah Yes....");
                                break;
                        }
                    }
                }
            }
            catch(Exception ex)
            {
                Console.WriteLine(ex.ToString());
            }
        }
    }
}
Main View Model
Finally within the main view model we can subscribe to the Event, and in this case we will change the color of the Brush that’s Bound to the Ellipse indicating if there is an active connection.
        public MainViewModel()
        {
            _packetWriterServer = new PacketWriterServer();
            ConnecttoServerCommand = new RelayCommandBase(o => _packetWriterServer.ConnectToServer(OpCode), o => !string.IsNullOrEmpty(OpCode.ToString()));
            SendtoServerCommand = new RelayCommandBase(o => _packetWriterServer.SendtoServer(ServerMessage, ServerImagePath), o => !string.IsNullOrEmpty(ServerMessage) && !string.IsNullOrEmpty(ServerImagePath));
            SelectImageCommand = new RelayCommandBase(o => SetServerImagePath(), null);

            _packetWriterServer.connectedEvent += ServerConnected;
        }
        private Brush _connectionColor = Brushes.Red;
        public Brush ConnectionColor
        {
            get { return _connectionColor; }
            set { _connectionColor = value; OnPropertyChanged(nameof(ConnectionColor)); }
        }

        private void ServerConnected()
        {
            ConnectionColor = Brushes.Green;
        }
Connection Established Red Light Green Light
When the connection is made a return message from the server turns the ellipse color from Red to Green.
