
Table of Contents
C# Setting Up WPF With Dependency Injection
The Dependency Injection Design Pattern is one of the most frequently used Design Patterns in Real-Time Applications. So, as a developer, you should know why and how to use the Dependency Injection Design Pattern in C#.
The Dependency Injection Design Pattern in C# allows us to develop Loosely Coupled Software Components. In other words, we can say that Dependency Injection Design Pattern is used to reduce the Tight Coupling between the Software Components. As a result, we can easily manage future changes and other complexities in our application. In this case, if we change one component, then it will not impact the other components.
Before understanding the Dependency Injection Design Pattern using C#, let us first understand what is Tight Coupling and what is Loose Coupling in software development.
What is Tight Coupling in Software Design?
Tight Coupling means two objects are dependent on each other. That means when a class is dependent on another class, then it is said to be a tight coupling between these two classes. In that case, if we change the Dependent Object, then we also need to change the classes where this dependent object is being used. If your application is a small one, then it is not that difficult to handle the changes but if you have a big Enterprise-Level application, then it’s really very difficult to handle these changes.
What is Loose Coupling in Software Design?
Loosely Coupling means two objects are independent of each other. That means if we change one object then it will not affect another object. The loosely coupled nature of software development allows us to manage future changes easily and also allows us to manage the complexity of the application.
What is Dependency Injection Design Pattern in C#?
The Dependency Injection Design Pattern in C# is a process in which we are injecting the dependent object of a class into a class that depends on that object. The Dependency Injection Design Pattern is the most commonly used design pattern nowadays to remove the dependencies between the objects.
Dependency Injection (DI) is a design pattern used to implement IoC (Inversion of Control). It allows the creation of dependency objects outside of a class and provides those objects to a class that depends on it in three different ways (i.e. using Constructor, Method, and Property). The Dependency Injection Design Pattern involves 3 types of classes:
- Client Class: The Client Class (dependent class) is a class that depends on the Service Class. That means the Client Class wants to use the Services (Methods) of the Service Class.
- Service Class: The Service Class (dependency) is a class that provides the actual services to the client class.
- Injector Class: The Injector Class is a class that injects the Service Class object into the Client Class.
Different Types of Dependency Injection in C#:
The Injector Class injects the Dependency Object into the Client Class in three different ways. They are as follows.
- Constructor Injection: When the Injector Injects the Dependency Object (i.e. Service Object) into the Client Class through the Client Class Constructor, then it is called Constructor Dependency Injection.
class Samurai
{
    readonly IWeapon weapon;
    public Samurai(IWeapon weapon)
    {
        this.weapon = weapon;
    }
    public void Attack(string target)
    {
        this.weapon.Hit(target);
    }
}
2. Property Injection: When the Injector Injects the Dependency Object (i.e. Service Object) into the Client Class through the public Property of the Client Class, then it is called Property Dependency Injection. This is also called the Setter Injection.
using System;
using System.Text;
using System.Linq;
using System.Collections.Generic;

public interface IClass
{
	void Serve();
}

public class ServiceA : IClass
{
	public void Serve()
	{
    	Console.WriteLine("ServiceA is Called");
	}
}

public class Client
{
	private IClass _service;
	public IClass Service
 	{
 		set
    	{
    		_service = value;
 		}
    }

    public void Serve()
    {
        _service.Serve();
    }
}

class Program
{
	static void Main(string[] args)
    {
        Client client = new Client();

        ServiceA sA = new ServiceA();
        client.Service = sA;
        client.Serve();
	}
}
3. Method Injection: When the Injector Injects the Dependency Object (i.e. Service Object) into the Client Class through a public Method of the Client Class, then it is called Method Dependency Injection.
public interface ICar
{
    int Run();
}

public class BMW : ICar
{
    private int _miles = 0;

    public int Run()
    {
		return ++_miles;
    }
}

public class Driver
{
    private ICar _car = null;

    public Driver(){}

    public void UseCar(ICar car) {
        _car = car;
    }

    public void RunCar()
    {
        Console.WriteLine("Running {0} - {1} mile ", _car.GetType().Name, _car.Run());
    }
}
App.xaml
Now we have that out the way lets get started, within the App.xaml file we have to edit StartupUri within the App.xaml.cs file.
<Application x:Class="WpfApp2.App"
             xmlns="http://schemas.microsoft.com/winfx/2006/xaml/presentation"
             xmlns:x="http://schemas.microsoft.com/winfx/2006/xaml"
             xmlns:local="clr-namespace:WpfApp2"
             StartupUri="MainWindow.xaml">
    <Application.Resources>

    </Application.Resources>
</Application>
In my case I want to call a specific method called OnStartUp, which will be created in the App.xaml.cs file, to do this we have to change StartupUri to just StartUp as shown below.
<Application x:Class="WpfApp2.App"
             xmlns="http://schemas.microsoft.com/winfx/2006/xaml/presentation"
             xmlns:x="http://schemas.microsoft.com/winfx/2006/xaml"
             xmlns:local="clr-namespace:WpfApp2"
             Startup="OnStartup">
    <Application.Resources>

    </Application.Resources>
</Application>
App.xaml.cs OnStartUp
Now that we have pointed the Start Up Uri to a new method within the App.xaml.cs file we can leverage this to create a container that will be the basis for the dependency injection. In addition we will also implement logging using Serilog.
To do this we will need to add some additional packages;
- Microsoft.Extensions.Configuration
- Microsoft.Extensions.DependencyInjection
- Microsoft.Extensions.Hosting
- Serilog
These can be installed with the following xml being added to the project.cs, you may have to update the versions after the rebuild which will retrieve the packages from NuGet.
  <ItemGroup>
    <PackageReference Include="Microsoft.Extensions.Hosting" Version="7.0.1" />
    <PackageReference Include="Serilog" Version="2.12.0" />
    <PackageReference Include="Serilog.Expressions" Version="3.4.1" />
    <PackageReference Include="Serilog.Extensions.Hosting" Version="7.0.0" />
    <PackageReference Include="Serilog.Settings.Configuration" Version="7.0.0" />
    <PackageReference Include="Serilog.Sinks.Console" Version="4.1.0" />
    <PackageReference Include="Serilog.Sinks.File" Version="5.0.0" />
  </ItemGroup>
We will need to add an Interface and Class for the MainViewModel, we will look at a simple example of this later on. The hosting container will be where we add any classes that are required to be built on demand. In the current code we have added three a MainWindow for the WPF main window, logger for Serilog and the MainViewModel. In each case they have been added to the services as a singleton. This means that during the life of the application there can only ever be on instance of these objects, we can also Add Scoped, and Transient. Scoped is similar to Singleton but per user session, if we were creating a web service then each user would get a unique object instead of all users sharing the same object (singleton). Transient objects are created on demand and maintained during the scope life of an object.
Once the configured service is configured and built any time a class needs one of the service objects they will be provided during construction by the configured service. This means we can separate a monolithic program into seperate concerns.
using Microsoft.Extensions.Configuration;
using Microsoft.Extensions.DependencyInjection;
using Microsoft.Extensions.Hosting;

using Serilog;

using System;
using System.IO;
using System.Text;
using System.Windows;

namespace WpfApp2
{
    public partial class App : Application
    {
        private MainWindow? _mainwindow;
        private ILogger? _logger;
        private IHost? _host;

        private void OnStartup(object sender, StartupEventArgs e)
        {
            Encoding.RegisterProvider(CodePagesEncodingProvider.Instance);

            IConfigurationBuilder builder = new ConfigurationBuilder();
            BuildConfig(builder);

            _logger = new LoggerConfiguration()
                .ReadFrom.Configuration(builder.Build())
                .Enrich.FromLogContext()
                .CreateLogger();

            _logger.Information("App - OnStartup - Application Starting");
            _logger.Information("App - OnStartup - Adding Dependancies");

            _host = Host.CreateDefaultBuilder()
                .ConfigureServices((context, services) =>
                {
                    services.AddSingleton(m => new MainWindow());
                    services.AddSingleton(_logger);
                    services.AddSingleton<IMainViewModel, MainViewModel>();
                })
                .UseSerilog()
                .Build();

            _logger.Information("App - OnStartup - Creating the Main UI.");
            _mainwindow = _host.Services.GetRequiredService<MainWindow>();

            _logger.Information("App - OnStartup - Setting the UI DataContext.");
            _mainwindow.DataContext = ActivatorUtilities.CreateInstance<MainViewModel>(_host.Services);

            _logger.Information("App - OnStartup - Showing UI.");
            _mainwindow.Show();
        }
Serilog appsettings.json
Within the App.xaml.cs file we can also define Serilog by adding the static method as shown below.
        private static void BuildConfig(IConfigurationBuilder builder)
        {
            builder.SetBasePath(Directory.GetCurrentDirectory())
                .AddJsonFile("appsettings.json", optional: false, reloadOnChange: true)
                .AddJsonFile($"appsettings.{Environment.GetEnvironmentVariable("ASPNETCORE_ENVIRONMENT") ?? "Production"}.json", optional: true)
                .AddEnvironmentVariables();
        }
We will need to add a YAML file appsettings.json, shown below, this will configure how Serilog generates log files (make sure the appsettings.json property’s : Build Action is set to Content and the Copy to Output Directory is set to Copy If Newer).
{
  "Serilog": {
    "Using": [ "Serilog.Sinks.Console"],
    "MinimumLevel": {
      "Default": "Debug",
      "Override": {
        "Default": "Information",
        "Microsoft": "Warning",
        "Microsoft.Hosting.Lifetime": "Information"
      }
    },
    "WriteTo": [
      {
        "Name": "Logger",
        "Args": {
          "configureLogger": {
            "Filter": [
              {
                "Name": "ByIncludingOnly",
                "Args": {
                  "expression": "(@l='Error' or @l='Fatal' or @l='Warning')"
                }
              }
            ],
            "WriteTo": [
              {
                "Name": "File",
                "Args": {
                  "path": "C:\\CatiaWidgets\\Logs\\WarnErrFatal_.log",
                  "outputTemplate": "{Timestamp:o} [{Level:u3}] ({SourceContext}) {Message}{NewLine}{Exception}",
                  "rollingInterval": "Day",
                  "retainedFileCountLimit": 7
                }
              }
            ]
          }
        }
      },
      {
        "Name": "Logger",
        "Args": {
          "configureLogger": {
            "Filter": [
              {
                "Name": "ByIncludingOnly",
                "Args": {
                  "expression": "(@l='Information' or @l='Debug')"
                }
              }
            ],
            "WriteTo": [
              {
                "Name": "File",
                "Args": {
                  "path": "C:\\CatiaWidgets\\Logs\\DebugInfo_.log",
                  "outputTemplate": "{Timestamp:o} [{Level:u3}] ({SourceContext}) {Message}{NewLine}{Exception}",
                  "rollingInterval": "Day",
                  "retainedFileCountLimit": 7
                }
              }
            ]
          }
        }
      }
    ],
    "Enrich": [
      "FromLogContext",
      "WithMachineName"
    ],
    "Properties": {
      "Application": "MultipleLogFilesSample"
    }
  }
}
Main View Model
To get the application to run we need to add an Interface and Class for the MainViewModel, this will inherit from a ViewModelBase class see below.
using Serilog;

namespace WpfApp2
{
    public interface IMainViewModel{}

    public class MainViewModel : ViewModelBase, IMainViewModel
    {
        private ILogger _logger;
        public MainWindow? MainWindow { get; } = null;
        public MainViewModel(
                                ILogger logger,
                                MainWindow mainWindow
                                )
        {
            logger.Information("Application Started.");

            _logger = logger;
            MainWindow = mainWindow;
        }
    }
}
View Model Base
With WPF all ViewModels must inherit from a View Models Base Class, which implements an interface call INotifyPropertyChanged. This will ensure that any property we create can call this OnPropertyChanged method that will update any UI attribute data.
using System.ComponentModel;

namespace WpfApp2
{
    public class ViewModelBase : INotifyPropertyChanged
    {
        public event PropertyChangedEventHandler? PropertyChanged;

        protected void OnPropertyChanged(string propertyName)
        {
            PropertyChanged?.Invoke(this, new PropertyChangedEventArgs(propertyName));
        }
    }
}
Running the App
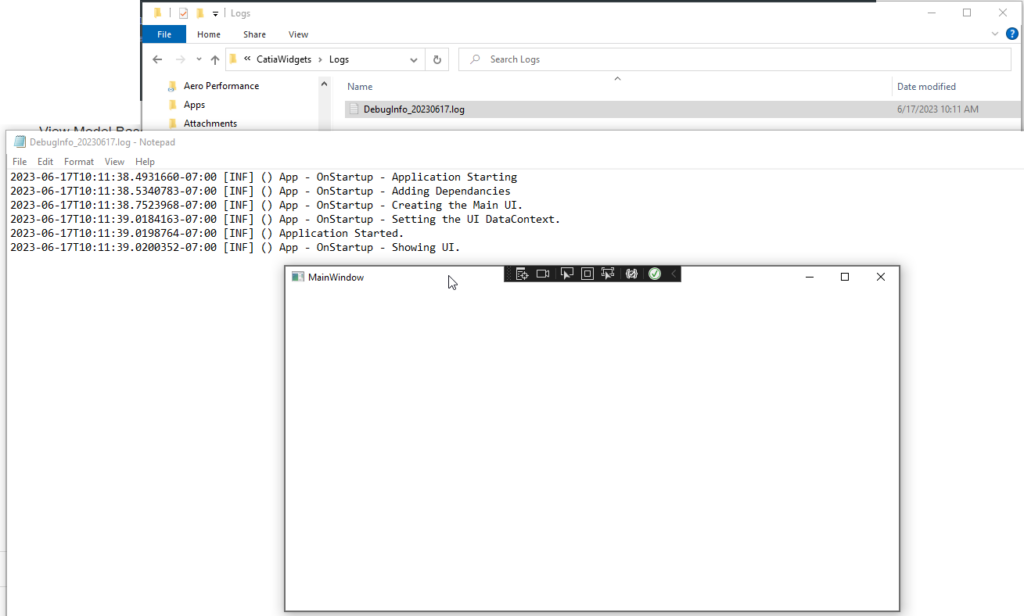
When the application is built an executed, we can see we now get the XAML main window, a new Log file that contains the logged information. The XAML window is using the MainViewModel for its DataContext. This is all being supplied by the hosted service.
We never once used the New keyword, and as long as interfaces and there respected classes are added to the hosted service they can be referred to within the constructor but the class its self is never New’d.
WPF Navigation
Typically we want to have multiple View Models and there associated Views. To keep track of which is the active View Model and View we need a class that’s dedicated to this, called NavigationStore.
using System;

namespace WpfApp2
{
    public interface INavigationStore
    {
        IViewModelBase? CurrentViewModel { get; set; }
        event Action CurrentViewModelChanged;
    }

    public class NavigationStore : INavigationStore
    {
        public IViewModelBase? _CurrentViewModel;
        public IViewModelBase? CurrentViewModel
        {
            get
            {
                return _CurrentViewModel;
            }
            set
            {
                _CurrentViewModel = value;
                OnCurrentViewModelChanged();
            }
        }
        public event Action? CurrentViewModelChanged;

        private void OnCurrentViewModelChanged()
        {
            CurrentViewModelChanged?.Invoke();
        }
    }
}
Now that we have the Navigation Store, we have to add this to the Hosted Container Service, and pass it to the Main View Model.
Adding the Navigation Store to App.xaml.cs
We start of by adding a singleton for the Navigation store, as shown below, in the App.xaml.cs file.
            _host = Host.CreateDefaultBuilder()
                .ConfigureServices((context, services) =>
                {
                    services.AddSingleton(m => new MainWindow());
                    services.AddSingleton(_logger);
                    services.AddSingleton<INavigationStore,NavigationStore>();
                    services.AddSingleton<IMainViewModel, MainViewModel>();
                })
                .UseSerilog()
                .Build();
Adding the Navigation Store to MainViewModel
Now that we have added this we can just request this object by add a public property and then adding it to the constructor of the MainViewModel class.
    public class MainViewModel : ViewModelBase, IMainViewModel
    {
        private readonly ILogger _logger;
        public INavigationStore NavigationStore { get; set; }
        public MainWindow? MainWindow { get; } = null;
        public MainViewModel(
                                ILogger logger,
                                MainWindow mainWindow,
                                INavigationStore navigationStore
                                )
        {
            logger.Information("Application Started.");

            _logger = logger;
            MainWindow = mainWindow;
            NavigationStore = navigationStore;
        }
    }
Adding Logging to the Navigation Store
Since we have a logging object in the Hosted Container Service, we can easily add it to the Navigation Store Class by adding a new Constructor and Property.
using System;
using Serilog;
namespace WpfApp2
{
public interface INavigationStore
{
ViewModelBase? CurrentViewModel { get; set; }
event Action CurrentViewModelChanged;
}
public class NavigationStore : INavigationStore
{
private readonly ILogger _logger;
public NavigationStore(ILogger logger)
{
logger.Information("NavigationStore - Constructor");
_logger = logger;
}
public ViewModelBase? _CurrentViewModel;
public ViewModelBase? CurrentViewModel
{
get
{
return _CurrentViewModel;
}
set
{
_CurrentViewModel = value;
OnCurrentViewModelChanged();
}
}
public event Action? CurrentViewModelChanged;
private void OnCurrentViewModelChanged()
{
CurrentViewModelChanged?.Invoke();
}
}
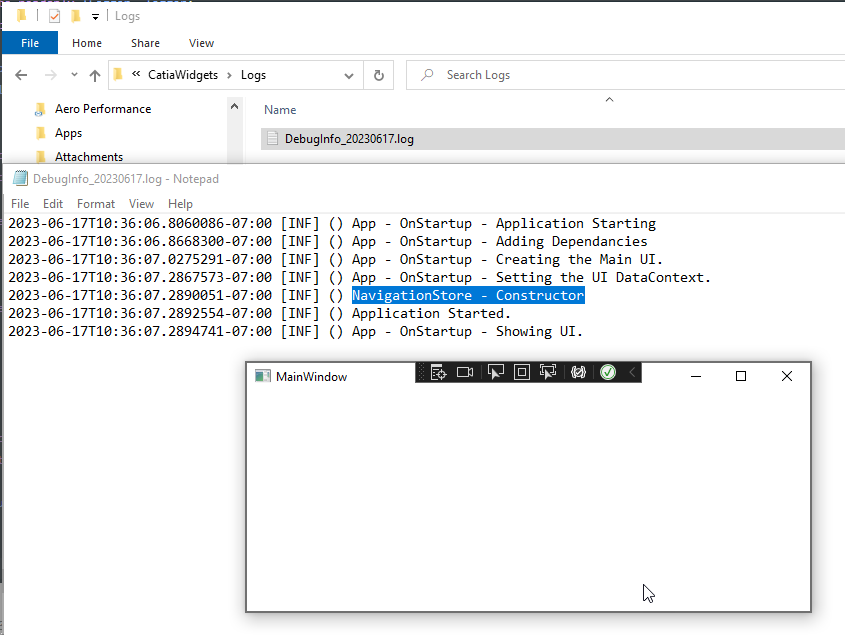
}So now when the application is executed we can see the additional logging that’s been added to the Navigation Store.
With a little clean up we can easily create a template for visual studio.