Table of Contents
Setting Up Python for 3DX Scripting
In this post were going to look at how to setup Python for 3DX CATIA development, so this is all new to me, so I’m going to document my learning.
IDE Interactive development Environment
The IDE that i chose was;
PyCharm 2022.2.2 (Community Edition)
Build #PC-222.4167.33, built on September 15, 2022
Runtime version: 17.0.4+7-b469.53 amd64
VM: OpenJDK 64-Bit Server VM by JetBrains s.r.o.
And seems to have most of what I’m looking for from a learning standpoint, although the grey on black coloring was a little hard for me I’m still looking for how to change this.
Python Installation
Currently I’m using 2020x which support Python 2.7.18 https://www.python.org/downloads/release/python-2718/ i downloaded the Windows x86-64 MSI Installer.

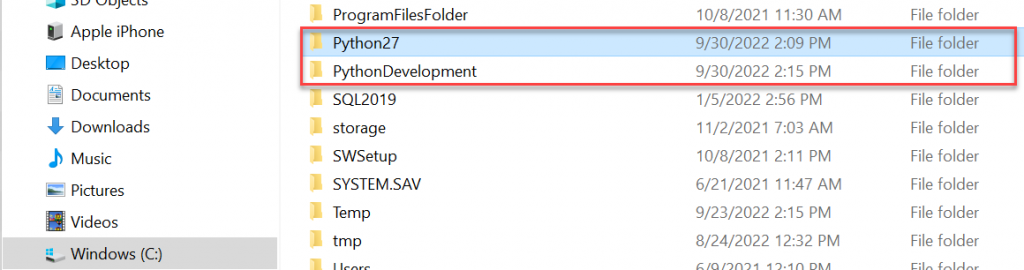
When I installed this I installed it directly to C: but you can put it where you want as long as you remember since we have to add some environment variables next. You will also notice I created an additional folder for where I’m going to create my project folders.
System Environment Variables
Within the Windows Search Panel
- Search for System Environment Variables and open the application.
- When the dialogue window displays select Environment Variables in the bottom right of the dialogue window.
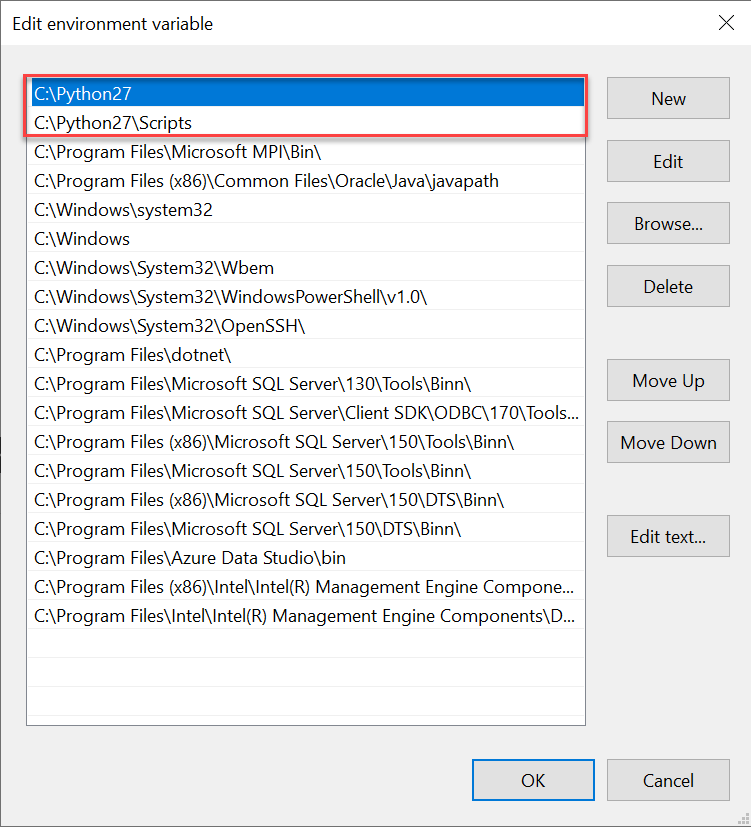
- Within the Environment Variables dialogue window, in the bottom list “System Environment Variables” scroll until you find “Path” and select it.
- Select the Bottom Edit button to edit the System Path Environment variable.
- Add the following two paths at the top of the list.
Our First Project in PyCharm
Start the PyCharm IDE, and select New Project.

Select the Location Folder and Within the Select Base Directory dialogue window navigate to the PythonDevelopment folder and create a new folder for the new project, then select Ok.
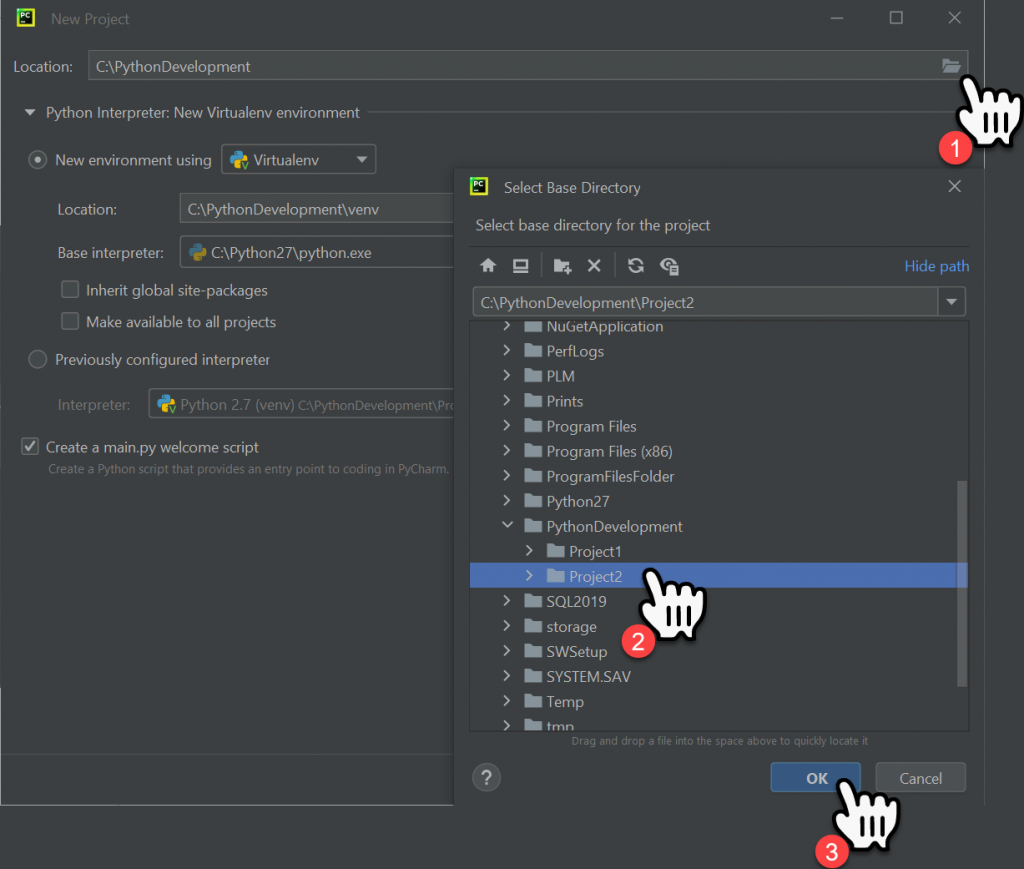
For now leave everything else the same, and select Create.

When the project starts we need to do a couple of simple setup steps to allow our project to talk to 3DX CATIA
the main.py class can be deleted, to do this right click on the main.py file in the project browser window and select Delete from the contextual menu, and select Ok within the Delete Dialogue window.

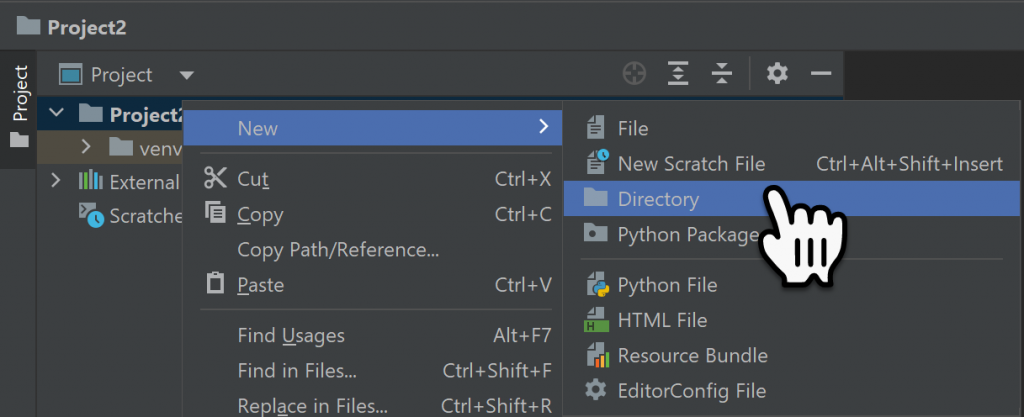
Again within the Project browser right mouse click on the Project2 folder and select New -> Directory from the secondary contextual menu, within the New Directory dialogue window define the directory name as 3rdParty press enter to create the new folder.
We need to copy a file from the CATIA installation which can be found in the installation path below the B422\win_b64\code\python2.7\lib folder for later versions of 3DX CATIA you can use a later version of Python. The file that needs to be copied is com3dx.pyc and needs to be pasted into the new 3rdParty directory just created as shown below.

Now this is done we can start writing our first Python Program obviously make sure that there is an instance of 3DX CATIA running.
Creating a New Geometrical Set in CATIA with Python
If you have had some experience in other programming languages within CATIA then the following should make sense, I will do my best to explain what’s going on if you have not.
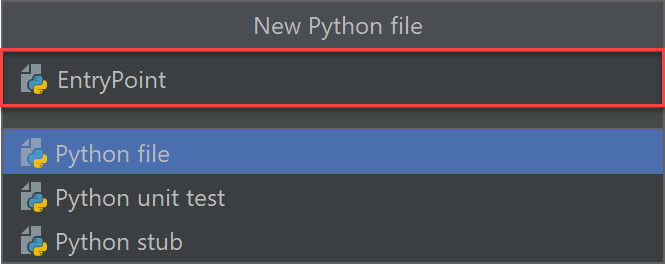
First we need to create a new .py file where we can write our program, to do this right mouse click on the Project2 folder and select New -> Python File from the secondary contextual menu, we are going to call this File “EntryPoint.py”

Within the New Python File dialogue window key in EntryPoint and press enter.
Marshall
To talk to CATIA we have to use a Marshalling class to do this we will add the following boiler plate code to our EntryPoint.py file, making sure we put the path to the com3dx.pyc file that’s in the 3rdParty folder in the Open statement (we need to define the full local path to the Python Project as shown). This will read the com3dx.pyc file and use this to establish a connection to the active 3dx CATIA sessions application.
import marshal

# open and execute com3dx python binary (***** WILL ONLY WORK IN PYTHON 2.7 ENVIRONMENTS!!! *****)
s = open('3rdParty/com3dx.pyc', 'rb')  # dassault com3dx lib for accessing the CATIA application object
s.seek(8)  # seek past the first 8 bytes
exec(marshal.load(s))  # un-marshall and execute code in the com3dx.pyc binary
pywin32
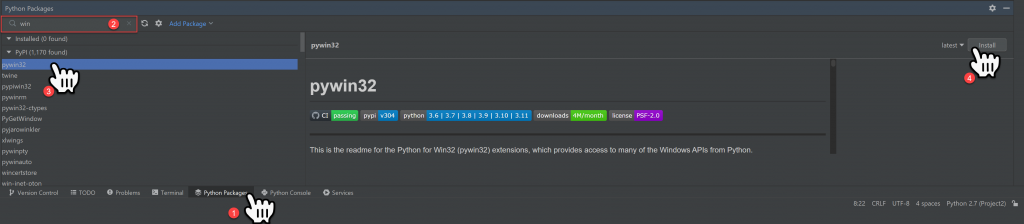
We have to install the pywin32 module to allow us to work with 3DX CATIA, to do this in the bottom of the PyCharm window select the Python Packages tab and then search for Win, then select the ptwin32 package and press Install.
Once this is installed we can add the import statement to our code as shown below;
import marshal
import win32com


# open and execute com3dx python binary (***** WILL ONLY WORK IN PYTHON 2.7 ENVIRONMENTS!!! *****)
s = open('3rdparty/com3dx.pyc', 'rb')  # dassault com3dx lib for accessing the CATIA application object
s.seek(8)  # seek past the first 8 bytes
exec(marshal.load(s))  # un-marshall and execute code in the com3dx.pyc binary
Creating CATIA Objects
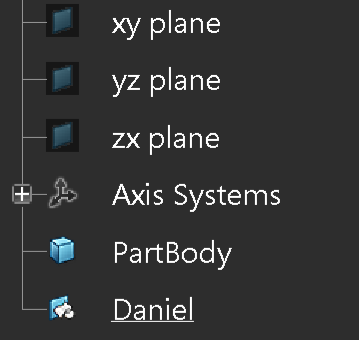
So here is the final code that will create a new Geometrical Set Called Daniel lets go through it line by line.
import marshal
import win32com


# open and execute com3dx python binary (***** WILL ONLY WORK IN PYTHON 2.7 ENVIRONMENTS!!! *****)
s = open('3rdparty/com3dx.pyc', 'rb')  # dassault com3dx lib for accessing the CATIA application object
s.seek(8)  # seek past the first 8 bytes
exec(marshal.load(s))  # un-marshall and execute code in the com3dx.pyc binary

CATIA = get3dxClient()

Editor = CATIA.ActiveEditor
Part = Editor.ActiveObject
HybridBodies = Part.HybridBodies
HybridBody = HybridBodies.Add()
HybridBody.Name = "Daniel"
So python is a loosely typed language (late typed) meaning we don’t have to define the variables types, the compiler will do this at compile time. However for an IDE that may use intellisence this causes a problem since it has no idea what the object type is an what should be displayed in the intellisence dropdown. So far I have not seen any intellisence in PyCharm so its back to learning the compete DOM Document Object Model.
Any how this first line is critical, since it creates the connection to CATIA. CATIA is the variable name and tot he right of the equals is a method that gets the CATIA application.
CATIA = get3dxClient()
The next line is a standard method that belongs to the Application object (here called CATIA, its our variable name that was equated previously to the CATIA application, we could have called it Bob or Daniel or even Application). The Editor word again is a variable name that were equating to the Active Editor object. So at runtime we must have an Active Editor in CATIA, 3DShape, 3D Part, Physical Product or Drawing. Obviously we cant create a Geometrical Set in a Drawing or Physical Product, so the final code will throw an error in these cases.
Editor = CATIA.ActiveEditor
Once we have the Active Editor we can try to get the Active Object, out variable name is Part so were assuming that there is either a 3DPart open in the Active Editor. However since Python is a late bound programming language if the Active Object is something else then the variable will be equated to this and the correct type assigned i.e. a Drawing and when we try to get the HybridBodies Collection the code will fail since you cant create Geometrical Sets (HybridBody) within a drawing.
Part = Editor.ActiveObject
Assuming that there is an Active 3DPart in the Editor then we will be able to get the HybridBodies Collection, this is a collection of Hybridbodys or Geometrical Sets. A normal user wont ever know about this object but behind the scenes CATIA has to be aware of al Geometrical Sets created at the Part level this is where the Hybribodies Collection object comes in.
HybridBodies = Part.HybridBodies
On the HybridBodies Collection Object there is a method that allows a new Geometrical Set (HybridBody) to be created, this method is called Add and returns the newly created HybridyBody.
HybridBody = HybridBodies.Add()
Once the HybridBody is created we can access the property Name on this object to update its display Name.
HybridBody.Name = "Daniel"
Testing the Code
Within PyCharm we can Run our Code by Selecting Run EntryPoint from the top dropdown Menu Run.

Once the Code has executed hopefully without issue then you will have a new Geometrical Set created in the 3DPart.