
Arduino R3 Basic Servo With Button Project
This is a simple project showing how to connect an inexpensive servo to the Arduino which is button enabled.
ref : https://www.youtube.com/watch?v=ksNbEuhO4fU
Wiring Diagram
- 1 x Arduino
- 1 x Servo
- 1 x LED 9Light Emitting Diode)
- 1 x Button
- 1 x 1K ohm Resistor (Button)
- 1 x 330 ohm Resistor (LED)
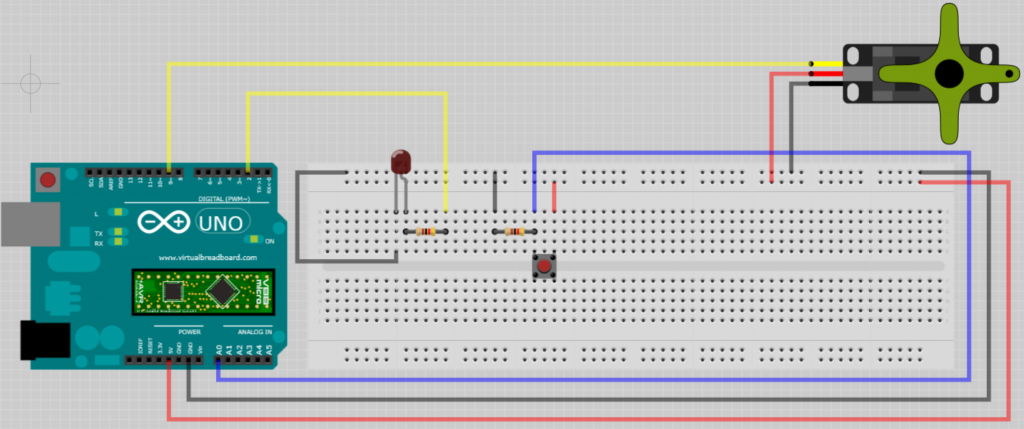
- Blue Wire – Analogue Wire to determine if the button has been pressed.
- Red Wires – 5 Volts Power Wires.
- Black Wires – Ground Wires.
- Yellow Wires – Digital Signal Wires.
Arduino Sketch
// Includes
#include <Servo.h>                				// include the servo library

// Constants
int baudRate = 115200;              			// set the baud rate value

// Pins
int buttonPin = A0;               				// set analog pin A0 as the button input pin
int ledPin = 2;                 				// set pin 2 as the output pin for the LED
int servoPin = 9;                				// set pin 9 as the output pin for the servo

// Initialize Values
int buttonValue = 0;              				// set the initial value of the button to off
int iDelay = 25;                 				// set the delay value

// Smoothing Variables
float switchScaled;
float switch1Smoothed;
float switch1Prev;

// Create Servo
Servo servo1;                	 				// create the servo object

void setup() {

  Serial.begin(baudRate);           			// start the serial terminal / plotter

  pinMode(ledPin, OUTPUT);            			// enable the LED output pin
  pinMode(buttonPin, INPUT);          			// enable the Button input pin

  servo1.attach(servoPin);            			// attach the servo to the pin
  servo1.writeMicroseconds(1200);       		// define the servo listening time
}

void loop() {

  buttonValue = digitalRead(buttonPin);     	// read the value of the button pin

  if (buttonValue != 0) {
    digitalWrite(ledPin, HIGH);          		// turn on the LED
  }
  else {
    digitalWrite(ledPin, LOW);           		// turn off the LED
  }

  switchScaled = buttonValue * 100;       		// value = 0 result = 0 else value = 1 result = 100
  switch1Smoothed = (switchScaled * 0.05) + (switch1Prev * 0.95); // smooth the value
  switch1Prev = switch1Smoothed;        		// store the value for the next loop

  Serial.print(switchScaled);         			// print to serial terminal/plotter
  Serial.print(" , ");
  Serial.println(switch1Smoothed);

  servo1.writeMicroseconds(switch1Smoothed);  	// set the servo position

  delay(iDelay);
}